
红豆冰砖
还有半个月就端午节了,想用来包粽子时用。嘻嘻。。
食谱取自:Cupcook(快速煮法),Homeeconomics(炒红豆馅),有少许更改!
材料:
500g 红豆 + 200ml 水
1500ml 水
200g 花生油
200g 黄糖
150g 麥芽糖
做法:
1. 500g 紅豆,洗好沥干放在容器中倒入約200ml的水,让紅豆淹在水中。(建议用小容器)
2. 放Fridge冷冻,这样可以有效破坏坚硬的豆子体,縮短煮紅豆的時間。至少要冷冻12小时以上效果比较好。(我放了2天,因为忘记了):-P
3. 取出紅豆冰砖放入气鍋(作者用電鍋內鍋),再倒入1500ml的水份,煮10分钟后关火,让红豆焖20-30分钟至没有气喷出来为止。(用气鍋煮好后千万不可立刻开鍋,切忌!)
4. 开气鍋取出熟红豆(这时的红豆应该是每粒都"裂开嘴"了)沥干水份(水千万不要倒掉,加点糖就是红豆汤了。精华呀! 也可留着做面包用。)
5. 趁红豆还有点微热,压一压很容易成豆泥了。
6. 把气鍋洗干净,烧热(我用气鍋炒红豆,因为它厚底不容易焦底)放花生油和黄糖,大火炒到糖快要融化,熄火。
7. 把豆泥加入翻炒,用鏟子把結块的豆泥压散。
8. 加入麥芽糖,開大火不斷翻炒,动作要快,才不会焦底。直到感觉豆泥不黏鍋,即可熄火。(鍋鏟刮过時豆泥有离鍋的感觉,就可以熄火。我只用15分钟炒而已!)

己沥干的熟红豆和红豆汤

花生油 + 黄糖

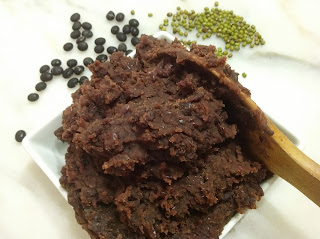
甜而不腻的红豆馅


